Monday, August 1, 2011

Teardrop Camper

Finished most of the exterior of the camper.

These fenders I purchased from Tractor Supply are just temporary till I purchased some sheet metal for my own design. These will do for now but not the style I'm looking for. 

Still need to finish more on the gallery,been focusing more on the exterior so I can get it inspected for a title.

I had these old Mopar ralley wheels off an old Plymouth I use to own so I sanded and painted them and had new tires mounted on.

Plan on putting a tool box up front and putting aluminum diamond plate under the trim for rock protection.

Took it for a test run and it pulled straight and true. Almost could'nt tell it was back there, with the exception that I need rear brakes on my jeep. Now all I lack is finishing.

Thursday, July 7, 2011

Wrisco Aluminum Sheeting

I applied the wrisco aluminum sheeting using rubber contact cement and routered the edges off.
Installed the cabinet prior to the sheeting since its screwed from the outside of the birch sidewall.
I'm a Harley Davidson fan so I chose orange and black for my teardrop camper.
In this picture you can also see the aluminum corner trim. It bends rather well to the radius with a little patience,a hammer and a block of wood.
Started on the galley hatch. Used 1/4 inch shims on the left,right and bottom. 3/8 inch shim at the hinge.
Ran a string line to insure all the spars are inline. They are inserted in a 3/4 inch routered joint and gorilla glued and screwed.

Wednesday, June 8, 2011

Cabinets and Wiring

Installed the wiring for marker,tail,turn and stop lights. Will be adding a hickory cabinet in the gallery after all the wiring and outlets are in then I will start on the gallery hatch.  

Installed a 12 volt circuit fuse box for interior lights,outlets and stereo. Will also be installing an inverter for 110 volt outlets.

Installed hickory cabinets and will be putting in a stereo and small flat screen tv later along with DC and AC outlets.

Prefitted the 12 volt Fantastic brand vent fan and installed a 12 volt ceiling light.

I insulated the top with 2 inch foam and bent birch plywood for the roof. Will be sheeting it with painted aluminum and then will be installing the window and door.

Monday, March 7, 2011

Bending the ceiling plywood

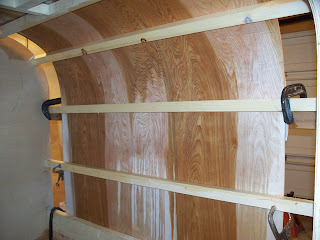
For the interior ceiling I use 1/4 inch sureply underlayment. Was going to use birch but the the color and grain of the sureply matched the hickory cabinets better that I'll be installing later. After several hours,lots of water and Goose Island Honker Ales I bent the sureply to the radius and left to dry in the clamped position.
I bent the radius on the outside of the camper which seemed to work well.
I installed the sureply in two pieces since the camper is 5 foot wide. When I installed the second piece I got a little impatient and the outer ply broke but the inside was fine. I attached the sureply with Gorilla glue and finishing nails.
I sanded the interier with 220 grit and applied two coats of Minwax polyurethane semi-gloss sanding between coats.
I also had rough cut the door opening that I'll install later. 

Wednesday, March 2, 2011

Birch Sidewalls


The sidewalls are 3/4 inch birch and I attached them to the frame using self tapping screws.

Since I don't own any bar clamps I notched some rough cut cedar trim I had laying around to pull the sidewalls to the gally bulkhead.

For roof spars I ripped a 2x8 to 1 1/2 inch pieces on a table saw. I framed the roof to fit a fantastic fan roof vent. All the spars are glued and screwed.

Thursday, February 17, 2011

Camper frame floor

The underbelly of the camper I used 1/2 inch treated plywood and attached it with self taping screws along with silicone rtv between the frame and wood. I also plan on applying an undercoating such as rhino liner or automotive type coating later on.

I insulated the floor with 2 inch foam from Lowes
For the floor I used 1/2 inch osb board and attached with self taping screws.

Thursday, February 10, 2011

Camper Frame

For the frame I'm using 2X2 12 guage box tubing. Welded with 7018 3/32 rod. The frame measures 5'X7' but the camper will be 5X8. This way the frame will be hidden in the front and rear. 
Welded on 500lb rubber torsion spindles.